Friday 28 November 2014

ADC - Automatic Document Creation in Oracle Purchasing R12.2


Concept: ADC is created for the documents like Blanket Purchase Agreement, Approved Quotes, and Contract Purchase Agreements to Release the Purchase Orders automatically.
  • Below is the process flow for reference:

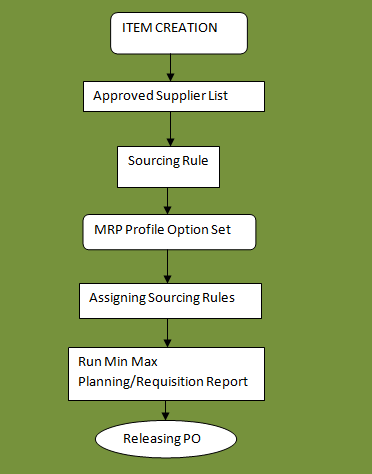
STEP 1: Item Creation
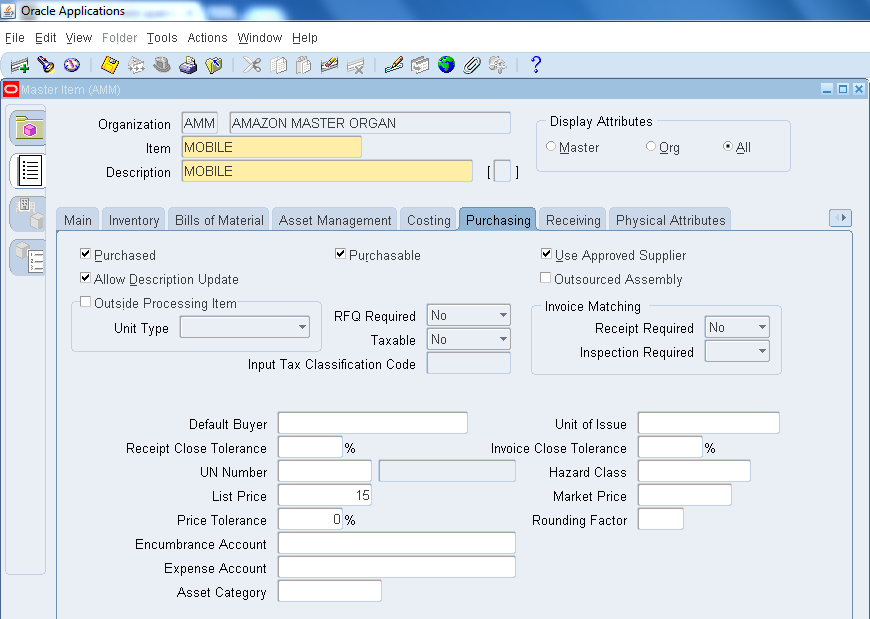
      Let’s create an item in Master Inventory with below details.
  • Item : MOBILE
  • Unit Price : $15
  • Purchasing Template
  • Use Approved Supplier
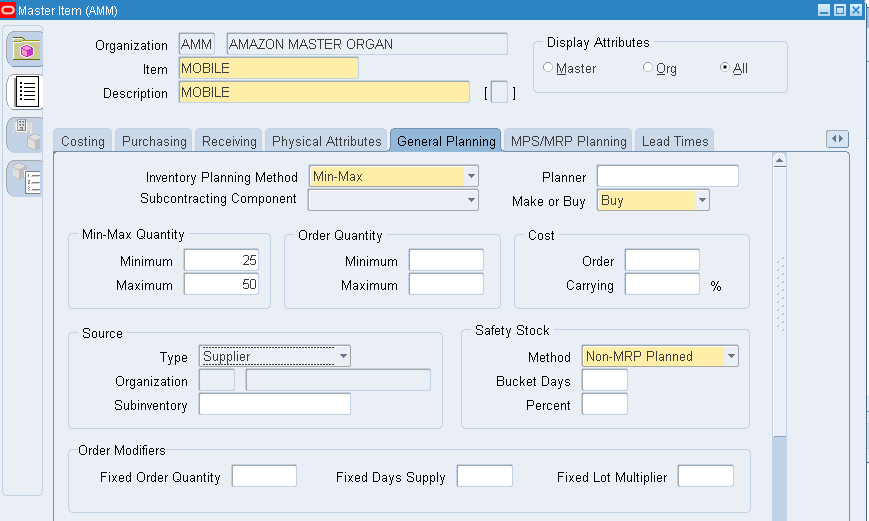
  • Inventory Planning Method: Min-Max
  • Min-Max quantity : 25-50
  • Source Type: Supplier

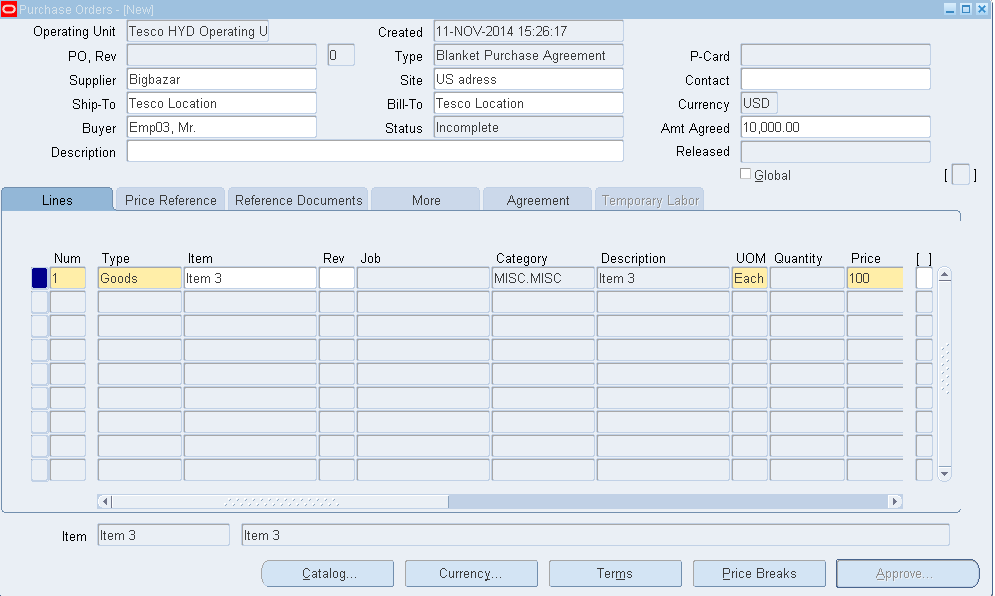
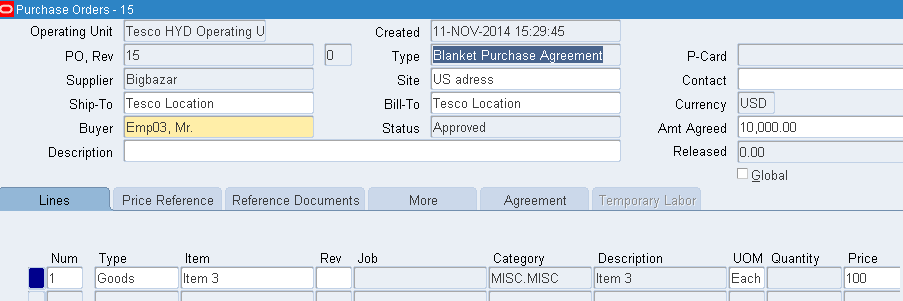
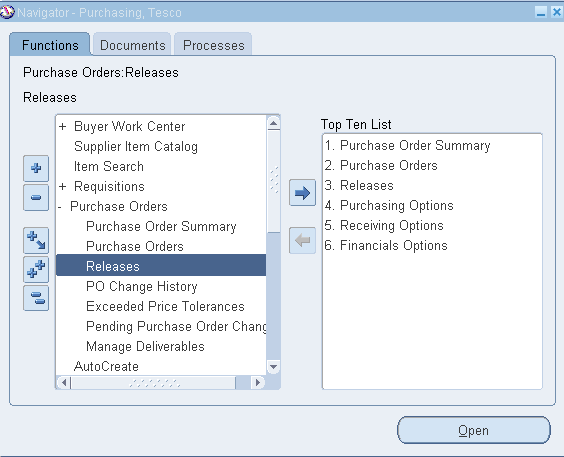
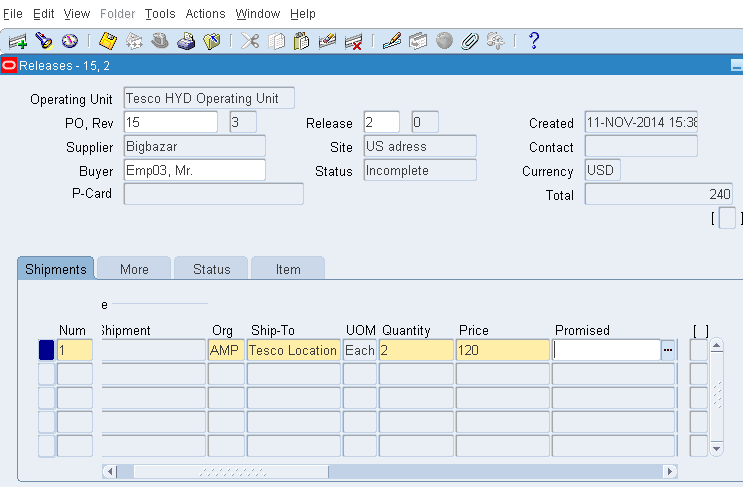
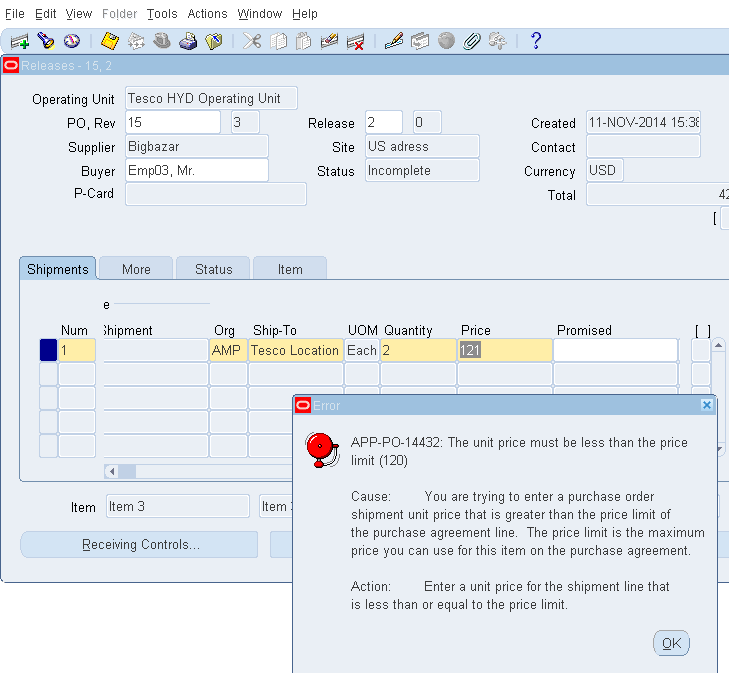
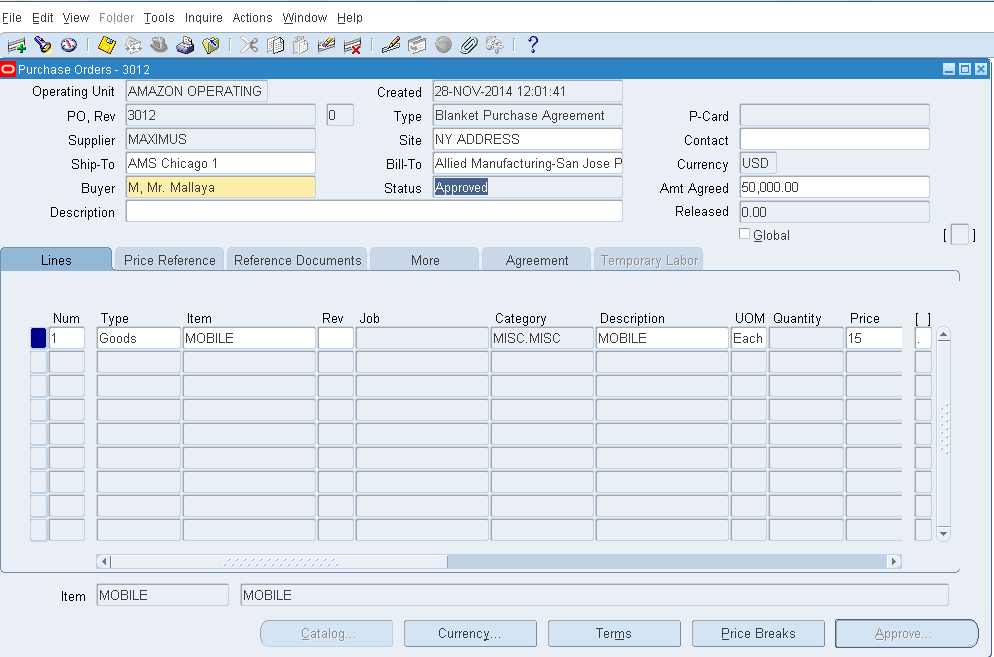
  • Now let’s open a normal purchase order and Type selected as Blanket Purchase Agreement and approve as below.
              Invoking: Purchasing->Purchase orders->Purchase orders.


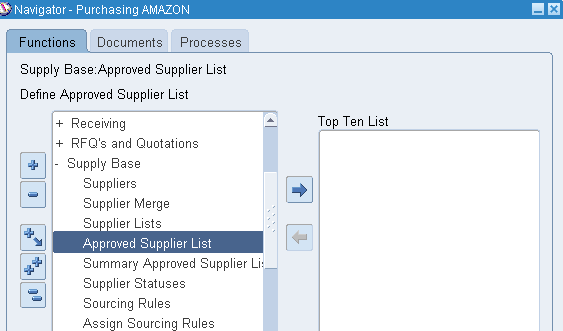
Step 2: Approved Supplier List
Invoking:  Purchasing->Supplier Base->Approved Supplier List.
  • Enter the item we created and fill in the key Attributes as below.
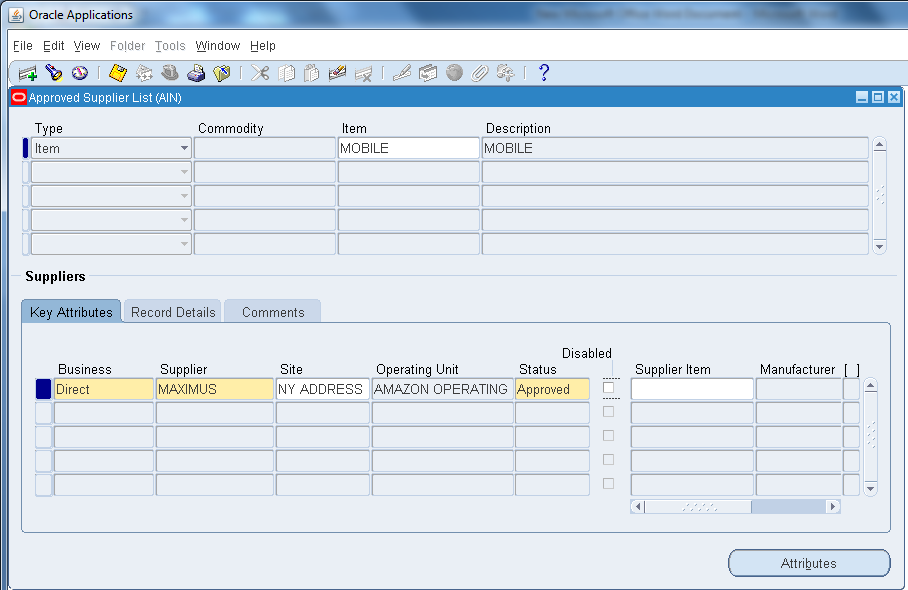
  • Save the above dialog box and Click on Attributes, and you will see the below form.
  • Mention the Blanket Purchase Agreement number we created before.
  • Release Method as "Automatic Release"


STEP 3: SOURCING RULES
  • Now let’s create Sourcing rules as below.
              Invoking: Purchasing->Supplier Base->Sourcing Rules

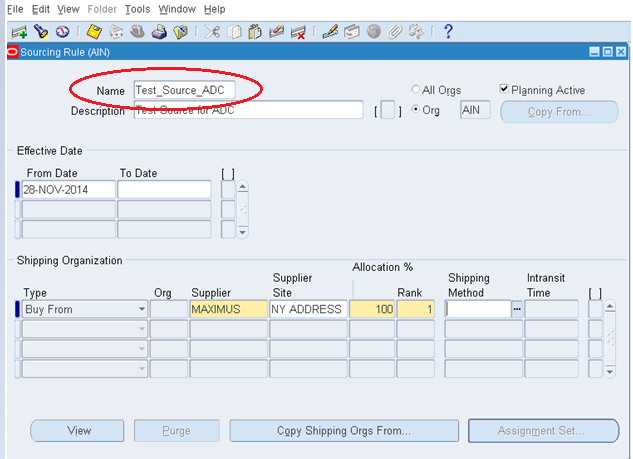
  • Here we have created the sourcing rules as Test_Source_ADC.

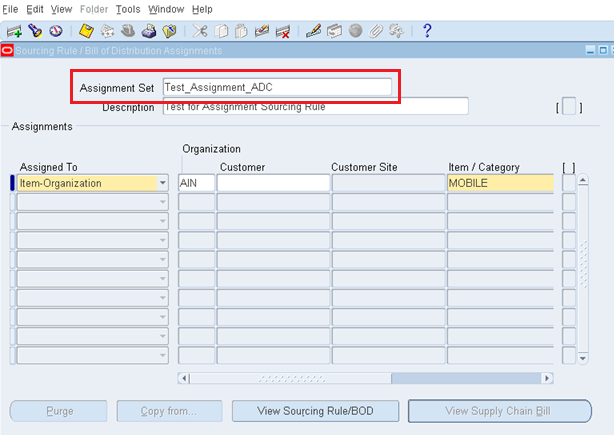
STEP 4: Assign Sourcing Rules
  • Now let’s assign the sourcing rule we created before, to this form, and Assignment Set as Test_Assignment_ADC
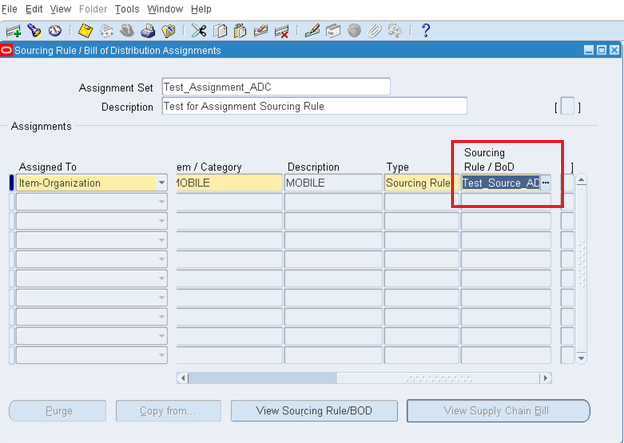
  • And if we scroll to the right above we can view Sourcing Rule/BoD where we can attach the sourcing rule we created, as below and save the form.


STEP 5: MRP Profile Option Set
  • Switch to System Administrator responsibility and select Purchasing as responsibility.
  • Profile: %MRP%Default% and attaché our assignment set (Test_Assignment_ADC)

Profile Option: MRP: Default Sourcing Assignment Set

STEP 6: Run Min-Max Planning Report and Requisition Report

  • Switch to inventory responsibility and run the Min-max planning as below.
              Invoking: Inventory->Planning-> Min-Max Planning
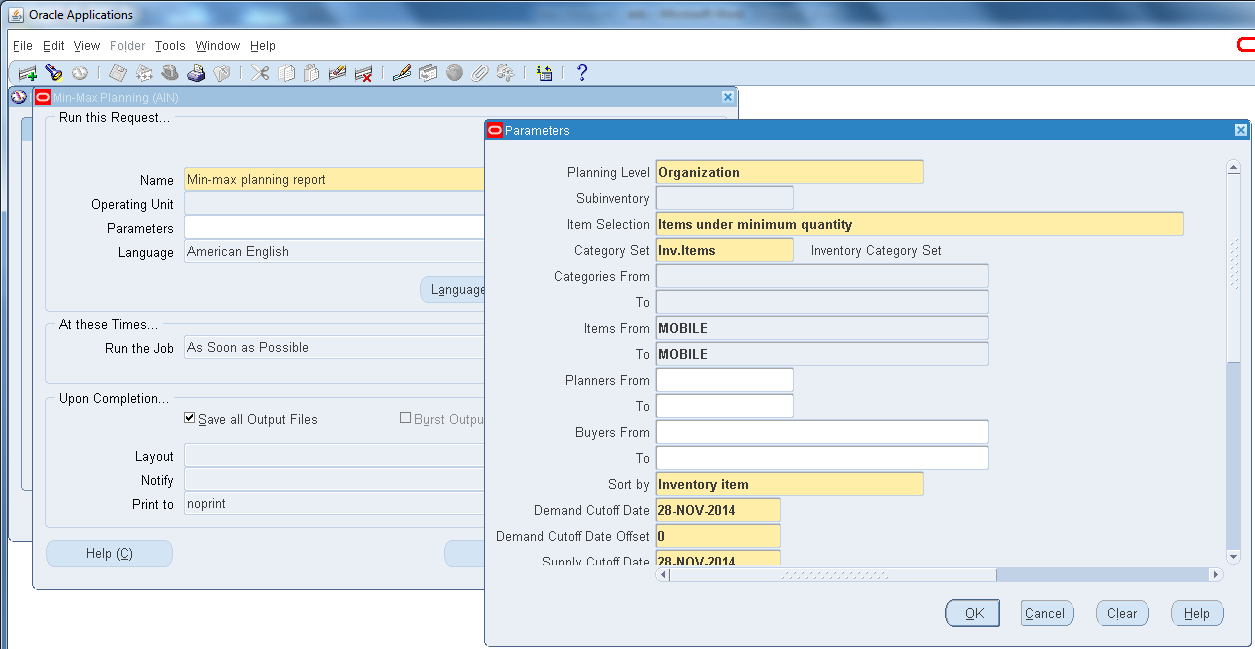
               & view the output.
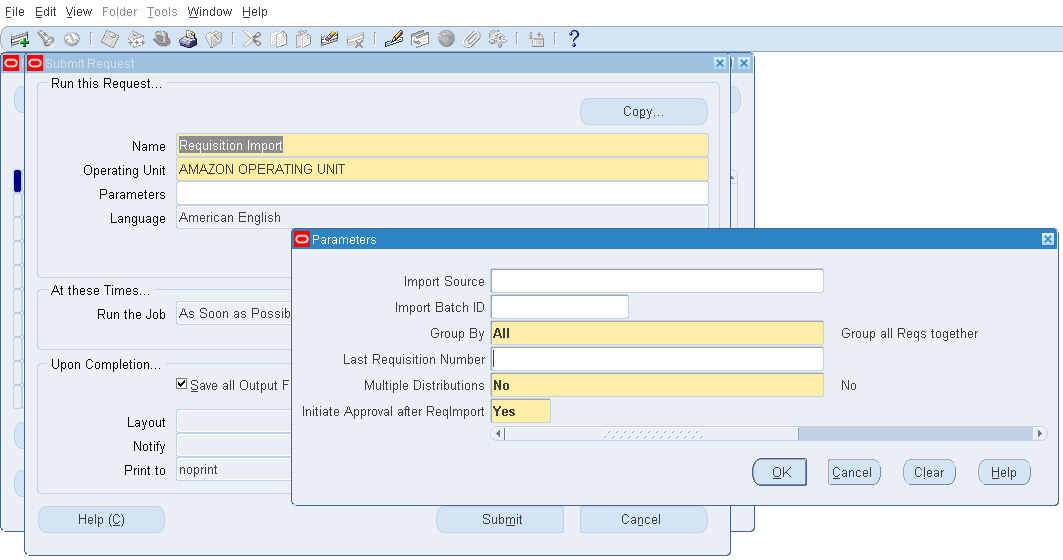
  • Simultaneously run "Requisition Import" report from purchasing responsibility
              Invoking: view->Requests->Submit new request
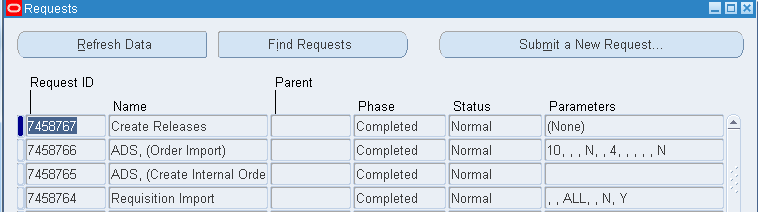
  • As soon as you run it, you can view four concurrent programs running at the background.

STEP 7: Releasing PO
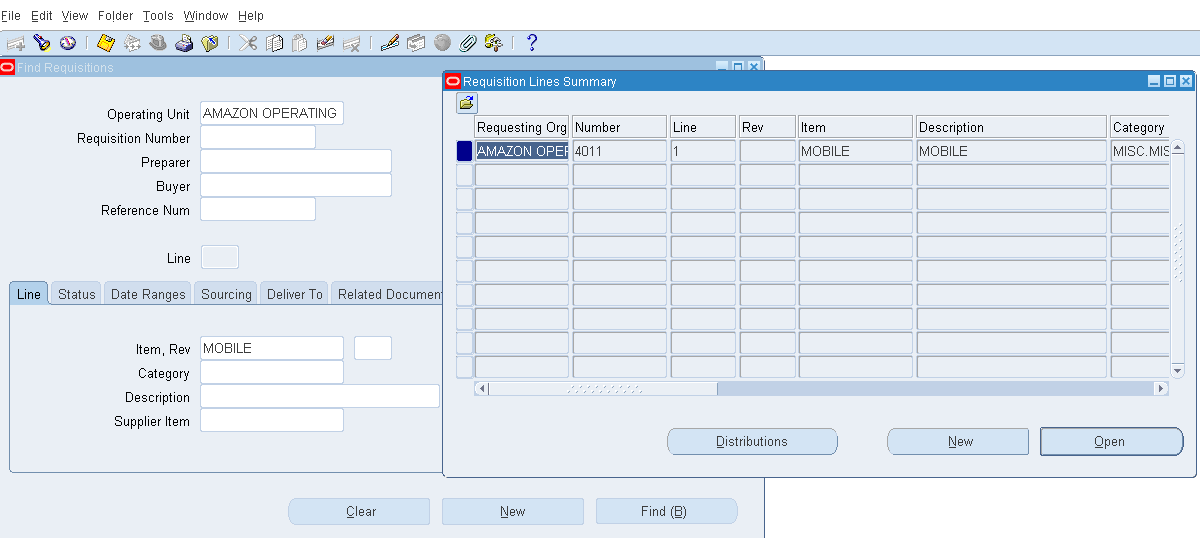
  • Now open Requisition summary and query by our item created: MOBILE.
              Invoking: Purchasing ->Requisitions->Requisition Summary
  • You can view the requisition line summary as below.
  • Now we are in the final step of the process.
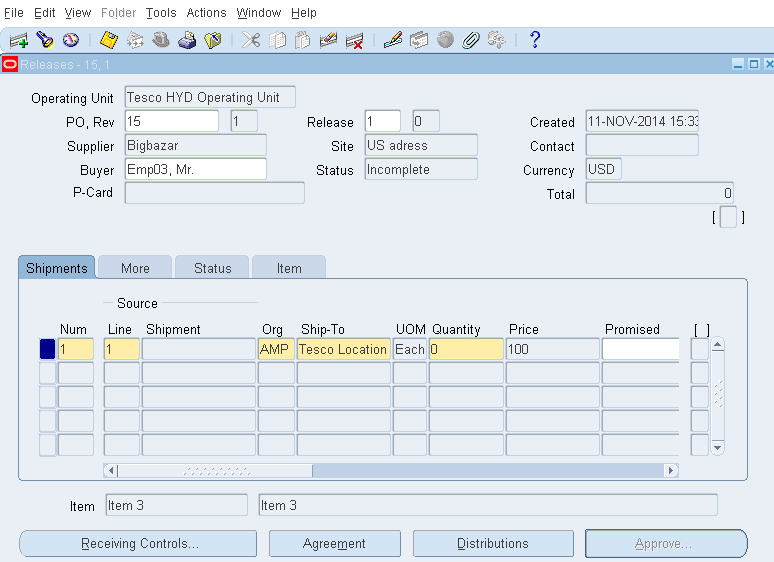
  • Open the Purchase Order  Summary, query by our item created (MOBILE) and make sure to check the View Releases check box.

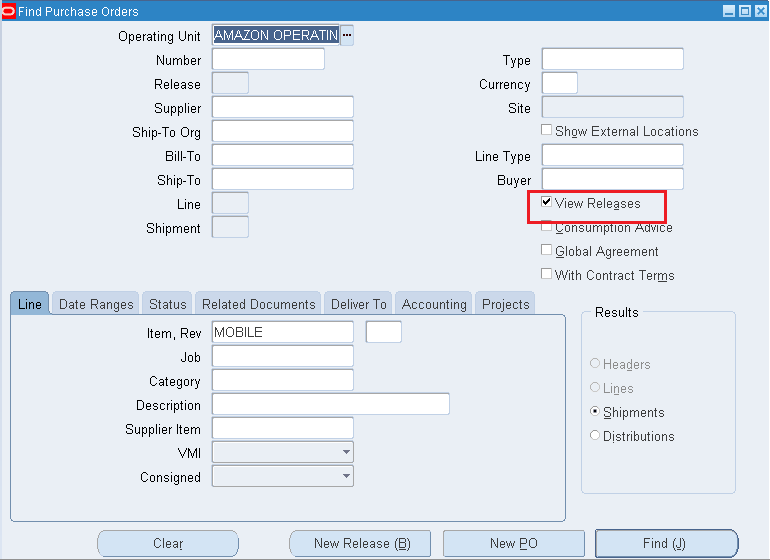
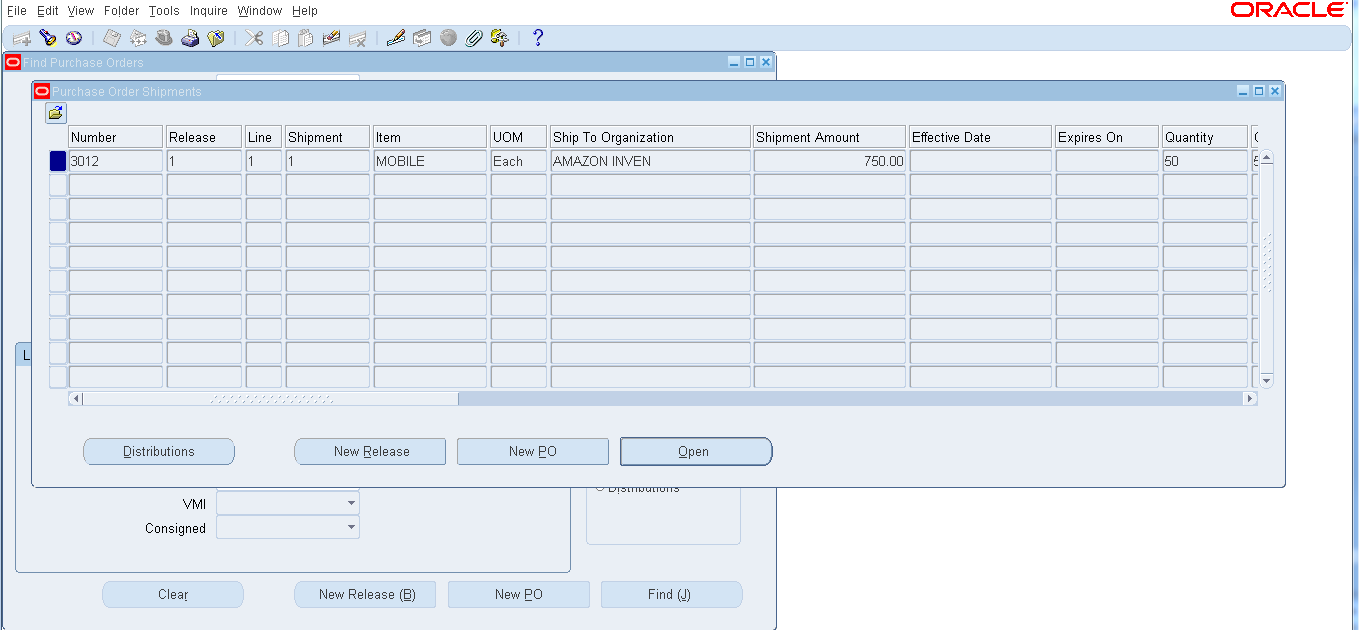
  • Now below we can view our release option dialog box.
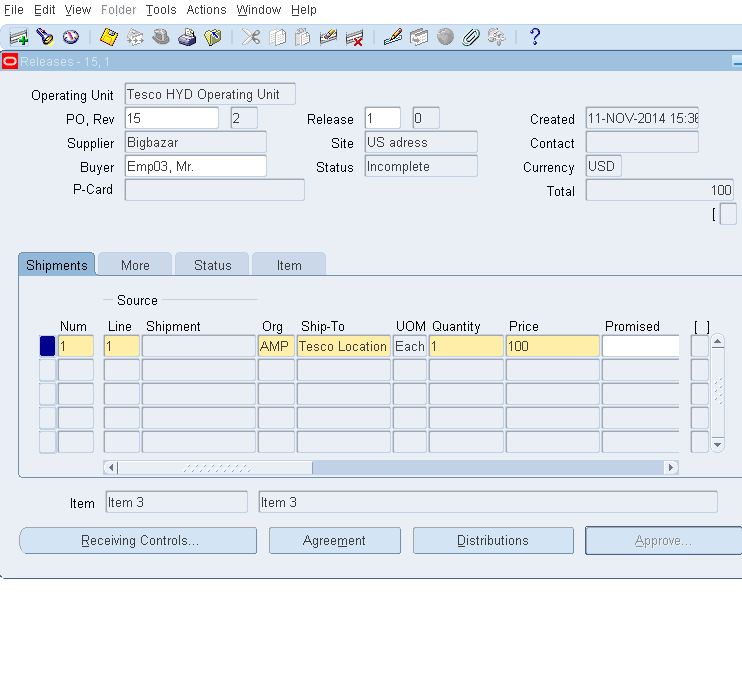
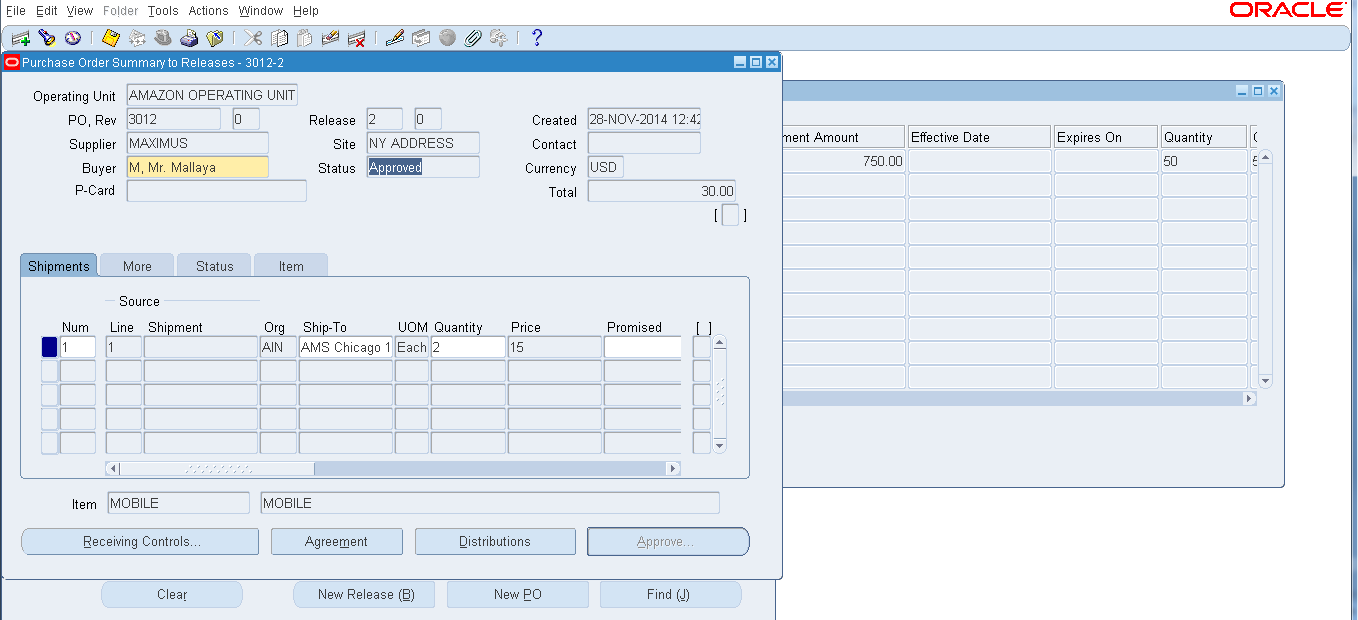
  • Click on Open and Approve the BPA release order.
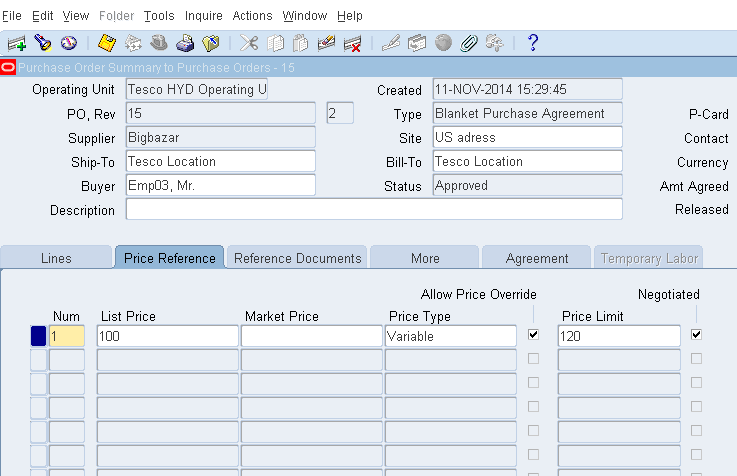
  • Meanwhile we can check our detailed agreement value and release amount by click on agreement Tab above.


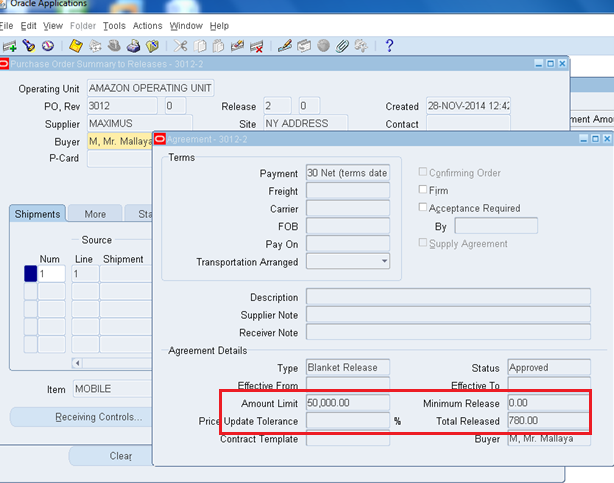
  • The total Agreement amount is $50,000 and we have released an order for $780, similarly we can release multiple BPA orders correspondingly.
  • This completes the process of Automatic Document Creation in Purchasing. 


Physical Counting in Oracle Inventory - R12.2

PHYSICAL COUNTING IN ORACLE EBS R12.2

Counting is used to verify the System On hand Quantity with Actual (Physical Qty) Quantity of the item and perform the adjustments in System OHQ.

These are two types of counting.
  • Physical Counting
  • Cycle Counting

Physical Counting:
It is used to verify the System On-hand Quantity and Actual Quantity of the item based on Sub inventory or Organization and perform the adjustments.
Normally we will perform this counting yearly once or twice. During Physical Counting, the Total Inventory will freeze and can't do any Transactions.

Step 1: Define the item through get on-hand quantity
Here we are defining three items like
IPHONE 4S, IPHONE 5S, IPHONE 6S

Step 2: Define Sub inventories
We are creating a sub inventories like SKV

Step 3: Items should have on-hand quantity
Through miscellaneous receipt we can get the on-hand quantity.
Like
IPHONE 4S =100, IPHONE 5S =100, IPHONE 6S =100.


Step 4: Define Physical Inventory

Navigation:  Inventory Counting Physical Inventory Physical Inventories

Click on New, the below dialog box appears.

You add the Tolerance and Qty of your choice.


Click on Snapshot, system automatically generate concurrent program.


Step 5: Generate Physical Inventory Tags

Navigation:  Counting Physical Inventory Tag Generation


Click on Generate.

Now the system will run  “Generate physical inventory tags” concurrent program.


Step 6: Run “Physical Inventory Tag Listing” Report

Navigation: View Request Submit New Request Single Request


Output of the report:


Step 7: Enter Physical(Actual) Quantity of the Item/Physical Inventory Tag counts

Navigation: Inventory Counting Physical Inventory Tag Counts

Select the Physical Inventory Name and then Click on Find

Now u will get one message like


Just click on Yes.

Now u will get below window


In the above you enter the quantity as 10 for all three Items, IPHONE 4S, 5S, 6S.


Step 8: Approve the Adjustments

Navigation:  Inventory Counting Physical Counting Approve Adjustments

Click on Find and Click on Yes, now you will get below window


Then u can select the Approve radio button against these 3 items and mention the approver.


Step 9: Performing the adjustments

Go to Physical inventory definition form query with our physical inventory

Navigation: Inventory Counting Physical Inventory Physical Inventories


Click on "Launch Adjustments"

Now you will get below window


Click on "Launch Adjustments"

Now system automatically generate concurrent program.

Select  View Request (Its Normal Below)


Step 10: Check out the On-hand quantity

Now go to inventory and select the on hand quantities for these 3 items as below.

Before we had 100 qty for each item after completing the physical counting we will get original qty of 10 each.


You can also view from Inventory Material Transaction, search for the item


This concludes Physical Counting.


BPA With Allow Price Override and Price Limit Functionality - R12.2

Allow Price Override and Price Limit in BPA

Case 1: Checking Allow Price Override

Step 1 - Create and Approve BPA:
Responsibility: Purchasing.
NAV: Purchase Orders--------Purchase Orders.
Create a Blanket Purchase Agreement for Item 3 with price as 100.
Approve the Blanket Order and note down the BPA number (15). 

Step 2 - Create Releases:
Now Release the Blanket Purchase Order.
NAV: Purchase Orders--------- Releases.
Query with PO number come to line level where you can notice that Price option is grayed out in the Price Tab which makes sure that you can only edit the quantity and not the Price while releasing the Blanket PO.

Step 3 - Enable "Allow Price Override":
Now again go to same purchase order and enable the "Allow Price Override" option in "Price Reference" TAB in the line level and save. (Price Limit will be defaulted from the List price)
Please note that any modifications in the approved blanket purchase agreement will change the status to Requires Re approval and creates the new Revision Number. Approve the Blanket PO again.
Now try to release the same line and notice as we gets the option to edit the price as below.
Note: Checking Allow Price Override option in the Line level makes you edit the price in the Blanket Release for that particular line.

Case 2: Price Limit control for Blanket release

Step 1 - Enter "Price Limit" Amount in BPA Lines:
Go to the same Blanket PO (above one) and change the Price Limit to 120 from 100 and save.

Step 2 - Change the Price in BPA Release upto 120:
Now if you try to release the Banket PO, you will be able to change the price maximum till 120.

Step 3 - Change the Price in BPA Release More than 120:

The system will not allow you to increase the price more than 120 as we have limited the line price to 120 in "Price Reference" TAB.